
متریال (Materials) در انگولار 6
Materials در انگولار ماژول های آماده زیادی برای زیبا سازی ظاهر و UI پروژه ها ارائه می کند. از جمله موارد ارائه شده می توان به Autocomplete، Datepicker، Slider، Menus، Grids و Toolbar اشاره کرد.
برای استفاده از متریال در انگولار باید دو بسته material و cdk را نصب کنید. برای نصب این دو بسته می توانید از دستور زیر استفاده کنید:
1 | npm install --save @angular/material @angular/cdk |
بعد از اجرا شدن دستور فوق اگر به فایل package.json نگاه کنید، بسته های مورد نظر نصب شده اند:
1 2 3 4 5 6 7 8 9 10 11 12 13 14 15 16 17 18 19 20 21 22 23 24 25 26 27 28 29 30 31 32 33 34 35 36 37 38 39 40 41 42 43 44 45 46 47 48 49 | { "name": "angular6-app", "version": "0.0.0", "scripts": { "ng": "ng", "start": "ng serve", "build": "ng build", "test": "ng test", "lint": "ng lint", "e2e": "ng e2e" }, "private": true, "dependencies": { "@angular/animations": "^6.1.0", "@angular/cdk": "^6.4.7", "@angular/common": "^6.1.0", "@angular/compiler": "^6.1.0", "@angular/core": "^6.1.0", "@angular/forms": "^6.1.0", "@angular/http": "^6.1.0", "@angular/material": "^6.4.7", "@angular/platform-browser": "^6.1.0", "@angular/platform-browser-dynamic": "^6.1.0", "@angular/router": "^6.1.0", "core-js": "^2.5.4", "rxjs": "^6.0.0", "zone.js": "~0.8.26" }, "devDependencies": { "@angular-devkit/build-angular": "~0.7.0", "@angular/cli": "~6.1.3", "@angular/compiler-cli": "^6.1.0", "@angular/language-service": "^6.1.0", "@types/jasmine": "~2.8.6", "@types/jasminewd2": "~2.0.3", "@types/node": "~8.9.4", "codelyzer": "~4.2.1", "jasmine-core": "~2.99.1", "jasmine-spec-reporter": "~4.2.1", "karma": "~1.7.1", "karma-chrome-launcher": "~2.2.0", "karma-coverage-istanbul-reporter": "~2.0.0", "karma-jasmine": "~1.1.1", "karma-jasmine-html-reporter": "^0.2.2", "protractor": "~5.3.0", "ts-node": "~5.0.1", "tslint": "~5.9.1", "typescript": "~2.7.2" } } |
حال باید ماژول مربوط به متریال را به فایل app.module.ts اضافه کنیم:
1 2 3 4 5 6 7 8 9 10 11 12 13 14 15 16 17 18 19 20 21 22 | import { BrowserModule } from '@angular/platform-browser'; import { NgModule } from '@angular/core'; import { BrowserAnimationsModule } from '@angular/platform-browser/animations'; import { MatButtonModule, MatMenuModule, MatSidenavModule } from '@angular/material'; import { FormsModule } from '@angular/forms'; import { AppComponent } from './app.component'; @NgModule({ declarations: [ AppComponent ], imports: [ BrowserModule, BrowserAnimationsModule, MatButtonModule, MatMenuModule, FormsModule, MatSidenavModule ], providers: [], bootstrap: [AppComponent] }) export class AppModule { } |
در کد فوق ما ماژول های MatButtonModule، MatMenuModule، MatSidenavModule را import و به بخش imports اضافه کرده ایم.
محتوای فایل app.component.ts را به صورت زیر تغییر دهید:
1 2 3 4 5 6 7 8 9 10 | import { Component } from '@angular/core'; @Component({ selector: 'app-root', templateUrl: './app.component.html', styleUrls: ['./app.component.css'] }) export class AppComponent { myData: Array<any>; constructor() {} } |
حال برای اینکه استایل Material بر روی ظاهر برنامه اعمال شود، کد زیر را به فایل styles.css اضافه کنید:
1 | @import "~@angular/material/prebuilt-themes/indigo-pink.css"; |
حال می توانید از ماژول های متریال در قالب برنامه استفاده کنید.
مانند نمونه زیر:
1 2 3 4 5 6 7 8 9 10 11 12 13 14 15 16 17 18 19 | <button mat-button [matMenuTriggerFor] = "menu">Menu</button> <mat-menu #menu = "matMenu"> <button mat-menu-item> File </button> <button mat-menu-item> Save As </button> </mat-menu> <mat-sidenav-container class = "example-container"> <mat-sidenav #sidenav class = "example-sidenav"> Angular 6 </mat-sidenav> <div class = "example-sidenav-content"> <button type = "button" mat-button (click) = "sidenav.open()"> Open sidenav </button> </div> </mat-sidenav-container> |
در مثال فوق ما Menu و SideNav را اضافه کرده ایم در ادامه این دو تگ را بررسی می کنیم.
تگ Menu
با استفاده از تگ
تگ SideNav
در کد بالا تگ
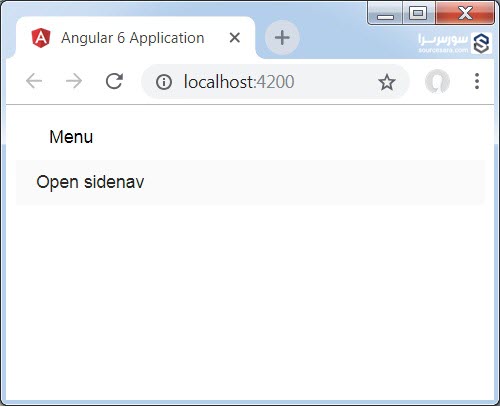
شکل زیر خروجی برنامه را نشان می دهد:
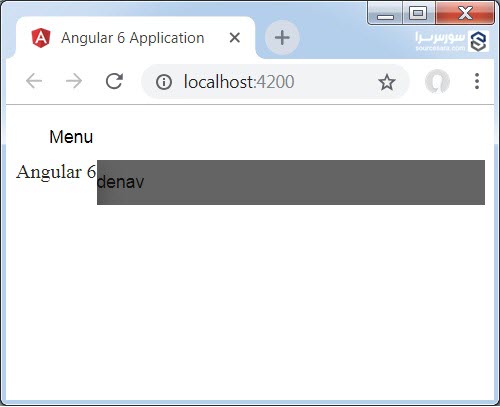
پس از کلیک بر روی opensidenav نوار جانبی مانند شکل زیر نمایش داده می شود:
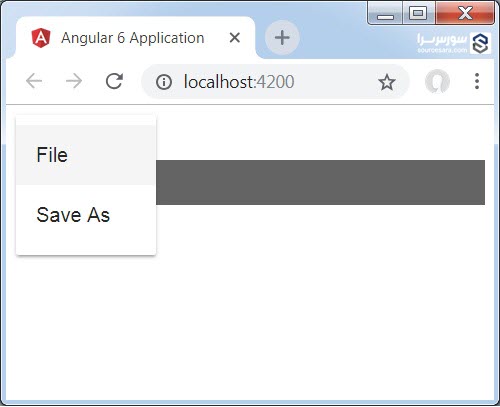
پس از کلیک بر روی دکمه menu آیتم های موجود در آن مانند شکل زیر نمایش داده می شود:
حال با استفاده از متریال، یک کنترل datepicker اضافه می کنیم. برای استفاده از این کنترل باید ماژول های مورد نیاز آن را به فایل app.module.ts اضافه کینم، مانند نمونه زیر:
1 2 3 4 5 6 7 8 9 10 11 12 13 14 15 16 17 18 19 20 21 22 | import { BrowserModule } from '@angular/platform-browser'; import { NgModule } from '@angular/core'; import { BrowserAnimationsModule } from '@angular/platform-browser/animations'; import { MatDatepickerModule, MatInputModule, MatNativeDateModule } from '@angular/material'; import { FormsModule } from '@angular/forms'; import { AppComponent } from './app.component'; @NgModule({ declarations: [ AppComponent ], imports: [ BrowserModule, BrowserAnimationsModule, FormsModule, MatDatepickerModule, MatInputModule, MatNativeDateModule ], providers: [], bootstrap: [AppComponent] }) export class AppModule { } |
در کد فوق ما ماژول های MatDatepickerModule، MatInputModule و MatNativeDateModule را وارد کرده ایم.
محتوای فایل app.component.ts:
1 2 3 4 5 6 7 8 9 10 | import { Component } from '@angular/core'; @Component({ selector: 'app-root', templateUrl: './app.component.html', styleUrls: ['./app.component.css'] }) export class AppComponent { myData: Array<any>; constructor() {} } |
محتوای فایل app.component.html:
1 2 3 4 5 | <mat-form-field> <input matInput [matDatepicker] = "picker" placeholder = "Choose a date"> <mat-datepicker-toggle matSuffix [for] = "picker"></mat-datepicker-toggle> <mat-datepicker #picker></mat-datepicker> </mat-form-field> |
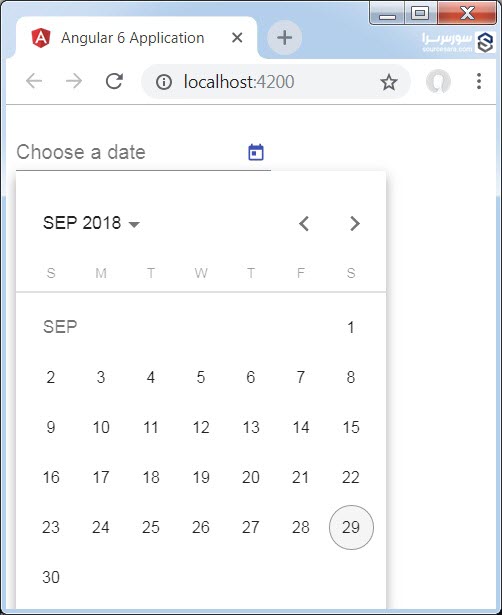
در زیر نحوه نمایش datepicker را مشاهده می کنید:







هیچ نظری ثبت نشده است